Featured image of post Vue3 Performance Optimization — Bundle Optimization

Vue3 Performance Optimization — Bundle Optimization

Through its data two-way binding and virtual DOM technologies, the Vue framework takes care of the most tedious and dirtiest part of front-end development ...

Through its data two-way binding and virtual DOM technologies, the Vue framework takes care of the most tedious and dirtiest part of front-end development — DOM manipulations. We no longer need to concern ourselves with how to manipulate the DOM or how to do it most efficiently. However, issues like first-screen optimization and compilation configuration optimization still exist in Vue projects. Therefore, we still need to focus on performance optimization for Vue projects to achieve more efficient performance and a better user experience.

Vue3 Performance Optimization — Code-Level Optimization

Gzip Compression

When front-end resources are too large, server resource requests can be slow. The front-end can reduce the file size by approximately 60% through Gzip compression. The compressed files, after simple processing by the backend, can be normally decoded by browsers.

Install Plugin

1
yarn add vite-plugin-compression -D

Vite Configuration

 1
 2
 3
 4
 5
 6
 7
 8
 9
10
11
12
// vite.config.ts
import viteCompression from 'vite-plugin-compression';

export default defineConfig({
    plugins: [
        // ....
        viteCompression({
            algorithm: 'gzip',
            deleteOriginFile: false, // Whether to delete source files after compression
        }),
    ],
});

For more configurations, please refer to the official documentation.

Server Configuration

After configuring the Vue part, deploying directly to nginx will not take effect immediately, it is also necessary to enable nginx’s gzip function. First, you need to confirm if the current nginx installation includes the gzip module, which generally installs the ngx_http_gzip_static_module by default. Before configuring, you can run the nginx -V command to check if the — with-http_gzip_static_module is included.

 1
 2
 3
 4
 5
 6
 7
 8
 9
10
11
12
13
14
15
16
17
18
19
20
21
22
23
24
25
26
27
28
29
30
31
32
33
34
// nginx.conf file

http{
  #......other configurations

  # server modularization
  include xxx/*.conf; # Create a folder named xxx in the same directory as nginx.conf
  
  # Enable gzip
  gzip on;

  # Static compression
  gzip_static on;

  # The minimum file size for gzip compression, files smaller than this value will not be compressed
  gzip_min_length 1k;
  
  # gzip compression level, 1-10, the higher the number, the better the compression and the more CPU time it consumes
  gzip_comp_level 2;
  
  # File types to be compressed. There are various forms of javascript. The values can be found in the mime.types file.
  gzip_types text/plain application/javascript application/x-javascript text/css application/xml text/javascript application/x-httpd-php image/jpeg image/gif image/png image/jpg;
  
  # Whether to add Vary: Accept-Encoding in the http header, recommended to enable
  gzip_vary on;
  
  # Disable IE 6 gzip
  gzip_disable "MSIE [1-6].";

  server{
    ...
  }
  #......other configurations
}

Then restart the nginx server, under normal circumstances, it should then be accessible.

Package Splitting

Here’s a personal insight: If different modules use largely the same plugins, then it’s best to package them in the same file whenever possible to reduce HTTP requests. If different modules use different plugins noticeably, then they should be packaged into different modules. This presents a contradiction.

Here, minimal package splitting is used. If it’s the former scenario, one can directly opt to return ‘vendor’.

 1
 2
 3
 4
 5
 6
 7
 8
 9
10
rollupOptions: {
  output: {
    manualChunks(id) {
      if (id.includes("node_modules")) {
        // Package each plugin into an independent file
        return id .toString() .split("node_modules/")[1] .split("/")[0] .toString(); 
      }
    }
  }
}

Static Resource Categorized Packaging

Vite is built on esbuild and rollup. When packaging, if the output is not configured, all files will be mixed together.

After configuring the output, all files are categorized and stored, making it easier for us to find files.

In the vite.config.js file, we configure the output as follows:

 1
 2
 3
 4
 5
 6
 7
 8
 9
10
11
12
13
14
15
16
build: {
  sourcemap: false,
  // Eliminate warning for package size exceeding 500kb
  chunkSizeWarningLimit: 4000,
  rollupOptions: {
    input: {
      index: pathResolve("index.html")
    },
    // Static resource categorized packaging
    output: {
      chunkFileNames: "static/js/[name]-[hash].js",
      entryFileNames: "static/js/[name]-[hash].js",
      assetFileNames: "static/[ext]/[name]-[hash].[ext]"
    }
  }
}

Vite Code Splitting Plugin — vite-plugin-chunk-split. Supports multiple code splitting strategies, can avoid potential cyclic dependency issues with manualChunks operations.

Remove Debugger in Production Environment

Use the vite-plugin-remove-console plugin developed by the platform to remove all console.log from the platform during the packaging and building process.

Packaging Analysis Plugin

Rollup Plugin Visualizer is a dependency analysis plugin that provides various modes of dependency analysis, including intuitive view analysis, sunburst (circular hierarchy chart, like a spectrum), treemap (rectangular hierarchy chart, which is more intuitive and also the default parameter), network (grid chart, to view inclusion relationships), raw-data (raw data mode, in JSON format), and list (list mode). You can choose any observation mode you like.

Install the rollup-plugin-visualizer plugin

1
yarn add rollup-plugin-visualizer -D

In vite.config.js, import and configure

 1
 2
 3
 4
 5
 6
 7
 8
 9
10
11
12
// Import
import { visualizer } from 'rollup-plugin-visualizer';

plugins: [
  // Add in the plugins configuration array
  visualizer({
    open:true, // Note that this needs to be set to true, otherwise it will not work. If there is a local server port, it will automatically display after packaging.
    gzipSize:true,
    file: "stats.html", // The file name of the generated analysis chart
    brotliSize:true
  }),
]

It will automatically display after packaging, with an effect chart:
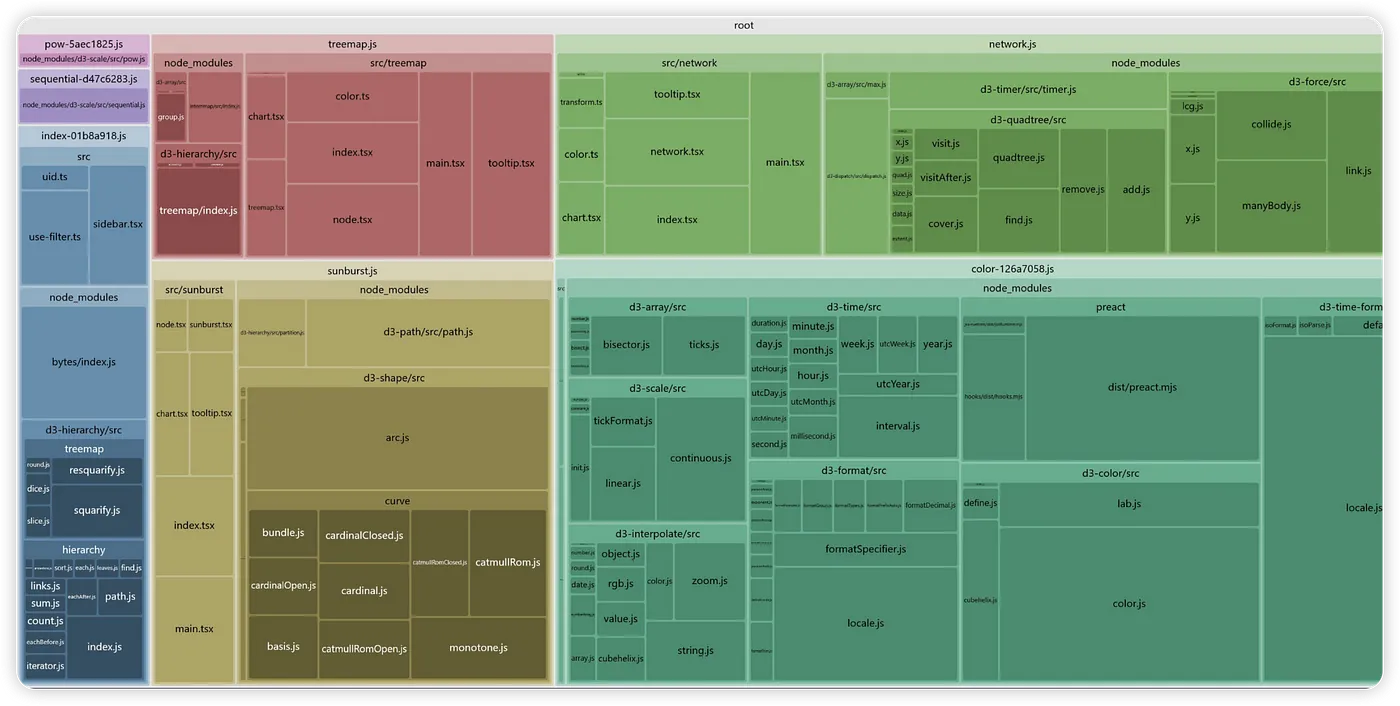
Image Resource Compression

Install the unplugin-imagemin plugin

1
pnpm add unplugin-imagemin@latest -D

Configure in vite.config.js

 1
 2
 3
 4
 5
 6
 7
 8
 9
10
11
12
13
14
15
16
17
18
19
20
21
22
23
24
25
26
27
28
29
30
31
32
// Import
import imagemin from 'unplugin-imagemin/vite';
import path from 'path';

// Add in the plugins configuration array
plugin: [
    imagemin({
        // Default mode sharp. support squoosh and sharp
        mode: 'squoosh',
        beforeBundle: true,
        // Default configuration options for compressing different pictures
        compress: {
          jpg: {
            quality: 10,
          },
          jpeg: {
            quality: 10,
          },
          png: {
            quality: 10,
          },
          webp: {
            quality: 10,
          },
        },
        conversion: [
          { from: 'jpeg', to: 'webp' },
          { from: 'png', to: 'webp' },
          { from: 'JPG', to: 'jpeg' },
        ],
      }),
]

SVG Compression

Generally, SVGs that are downloaded or SVG codes that are copied contain some irrelevant elements. These can be removed to reduce the SVG size without any impact.

Install the vite-plugin-svg-icons plugin

1
yarn add vite-plugin-svg-icons -D

Configure in vite.config.js

 1
 2
 3
 4
 5
 6
 7
 8
 9
10
11
12
13
14
15
16
17
18
19
20
21
22
23
import { createSvgIconsPlugin } from 'vite-plugin-svg-icons'
import path from 'path'

plugins: [
  createSvgIconsPlugin({
    // Specify the icon folder to be cached
    iconDirs: [path.resolve(process.cwd(), 'src/icons')],
    // Specify symbolId format
    symbolId: 'icon-[dir]-[name]',

    /**
     * custom insert position
     * @default: body-last
     */
    inject?: 'body-last' | 'body-first'

    /**
     * custom dom id
     * @default: __svg__icons__dom__
     */
    customDomId: '__svg__icons__dom__',
  }),
],

Introduce the registration script in src/main.ts

1
import 'virtual:svg-icons-register'

Notes:

If you encounter an error stating that fast-glob is not found, please execute the following command to install it:

1
npm install fast-glob -D

Usage

/src/components/SvgIcon.vue

 1
 2
 3
 4
 5
 6
 7
 8
 9
10
11
12
13
14
15
16
17
18
19
20
21
22
23
24
25
26
27
28
29
30
31
<template>
  <svg aria-hidden="true">
    <use :href="symbolId" :fill="color" />
  </svg>
</template>

<script>
import { defineComponent, computed } from 'vue'

export default defineComponent({
  name: 'SvgIcon',
  props: {
    prefix: {
      type: String,
      default: 'icon',
    },
    name: {
      type: String,
      required: true,
    },
    color: {
      type: String,
      default: '#333',
    },
  },
  setup(props) {
    const symbolId = computed(() => `#${props.prefix}-${props.name}`)
    return { symbolId }
  },
})
</script>

/src/component-a.vue

1
2
3
4
5
6
7
8
<template>
  <div>
    <SvgIcon name="icon1"></SvgIcon>
    <SvgIcon name="icon2"></SvgIcon>
    <SvgIcon name="icon3"></SvgIcon>
    <SvgIcon name="dir-icon1"></SvgIcon>
  </div>
</template>

Note:

The svg of the plug-in will not generate hash to distinguish, but distinguish it by folder.

If the folder corresponding to iconDirs contains this other folder

example:

Then the generated SymbolId is written in the comment

1
2
3
4
5
6
# src/icons
- icon1.svg # icon-icon1
- icon2.svg # icon-icon2
- icon3.svg # icon-icon3
- dir/icon1.svg # icon-dir-icon1
- dir/dir2/icon1.svg # icon-dir-dir2-icon1

CDN Acceleration

Install vite-plugin-cdn-import plugin

1
pnpm add vite-plugin-cdn-import -D

Configure in vite.config.js

 1
 2
 3
 4
 5
 6
 7
 8
 9
10
11
12
13
14
15
16
    plugins: [
        cdn({
            modules: [
                {
                  // The package name when importing
                  "name": "...",
                  // The variable assigned to the module when registering globally with app.use()
                  "var": "...",
                  // Find the corresponding CDN URL according to your own version number
                  "path": "...",
                  // Find the corresponding CDN URL for the CSS according to your own version number
                  "css": "...",
                },
            ],
        }),
    ],

Import Components On Demand

Install unplugin-vue-components plugin

1
yarn add unplugin-vue-components -D

Configure in vite.config.js

 1
 2
 3
 4
 5
 6
 7
 8
 9
10
11
12
13
14
15
16
17
import Components from 'unplugin-vue-components/vite'

export default defineConfig({
  plugins: [
    Components({
      // Configure Automatically Registered Components
      dts: true,
      resolvers: [
        (name) => {
          if (name.startsWith('Base')) {
            return { importName: name.slice(4), path: `@/components/${name}.vue` }
          }
        },
      ],
    }),
  ],
})

Browser Caching

To improve the speed at which pages load for users, caching static resources is essential. Based on whether there is a need to re-initiate requests to the server, HTTP caching rules are divided into two main categories (strong caching and validation caching).

If strong caching is effective, there is no need to interact with the server, while validation caching requires interaction with the server regardless of its effectiveness. Both types of caching rules can coexist, with strong caching having a higher priority than validation caching. This means that when the rules of strong caching are executed, if the cache is effective, it is used directly without executing the validation caching rules.

Client-Side Cache-Control

The caching strategy on the client side mainly relies on the following implementations:

  • The browser’s Refresh or Reload button;

  • The browser’s incognito mode (private mode);

  • The browser’s forward and back navigation;

  • The browser developer tool’s Disable cache option.

The implementation is relatively simple, usually involving appending Pragma: no-cache and Cache-Control headers in the request. This forces re-validation or unconditionally fetches the document from the server.

Server-Side Cache-Control

The server-side caching strategies are the relevant fields in the HTTP response headers:

  • Expires

  • Cache-Control

  • Last-Modified

  • Etag

For detailed information, you can refer to the MDN documentation.