In what aspects is the performance of Vue3.0 mainly improved?
Reactive Systems
The core of the reactive system in Vue.js 2.x relies on Object.defineProperty. The entire object is hijacked and then a deep traversal of all properties is carried out, with a getter and setter added to each attribute to achieve reactivity.
In Vue.js 3.x, the Proxy object is used to rewrite the reactive system.
It can monitor newly added dynamic properties.
It can monitor deleted properties.
It can monitor the index and length properties of the array.
Implementation Principle:
Through the Proxy (Agent): Intercepts any changes in object properties, including changing property values, adding properties, and deleting properties.
Via Reflect (Reflection): Operates on the properties of the source object.
Proxy and Reflect as Described in the MDN Documentation:
Proxy: Proxy — JavaScript | MDN
Reflect: Reflect — JavaScript | MDN
| |
Compilation Stage
Vue.js 2.x optimizes the diff process by marking static nodes
In Vue.js 3.x
Vue.js 3.x marks and lifts all static root nodes, during diff only has to compare the content of dynamic nodes
Fragments (upgrade vetur plugin): No need for unique root node in the template, you can directly place text or peer tags
Static promotion (hoistStatic), when using hoistStatic, all static nodes are lifted outside the render method. Only need to be created once when the application starts, and then used, just need to apply the extracted static nodes, which will be reused with each rendering.
Patch flag, add corresponding markings at the end of the dynamic tag, only the node with patchFlag is considered as a dynamic element, will track attribute modifications, can quickly find dynamic nodes, no need to traverse one by one, improved the performance of virtual dom diff.
Cache event handling function cacheHandler, avoid regenerating a new function every time it is triggered to update the previous function.
Source Code Size
Compared with Vue2, the overall size of Vue3 has been reduced, besides removing some infrequently used APIs.
Tree Shanking
Any function, such as ref, reactive, computed, etc., is only packaged when it is used.
Through static analysis in the compilation stage, find the modules that have not been imported and mark them, and shake off these modules.
What are the new components in Vue3?
Fragment
In Vue2: A component must have a root tag
In Vue3: A component can be without a root tag, multiple tags will be wrapped in a Fragment virtual element
Benefits: Reduces tag level, reduces memory usage
Teleport
What is Teleport? — — Teleport is a technology that can move our component’s HTML structure to a specified location.
| |
Suspense
Render some extra content while waiting for asynchronous components to provide a better user experience
Steps to use:
Asynchronously import components
| |
Wrap the component with Suspense and configure default and fallback
| |
What’s the difference between Vue2.0 and Vue3.0?
The reconfiguration of the reactive system, replacing Object.defineProperty with proxy.
TypeScript support.
Addition of the Composition API for better logic reuse and code organization.
The priority of v-if and v-for.
Static element hoisting.
Static marking of virtual nodes.
Changes in life cycle.
Package size optimization.
Improved ssr rendering performance.
Supports multiple root nodes.
Vue Life Cycle
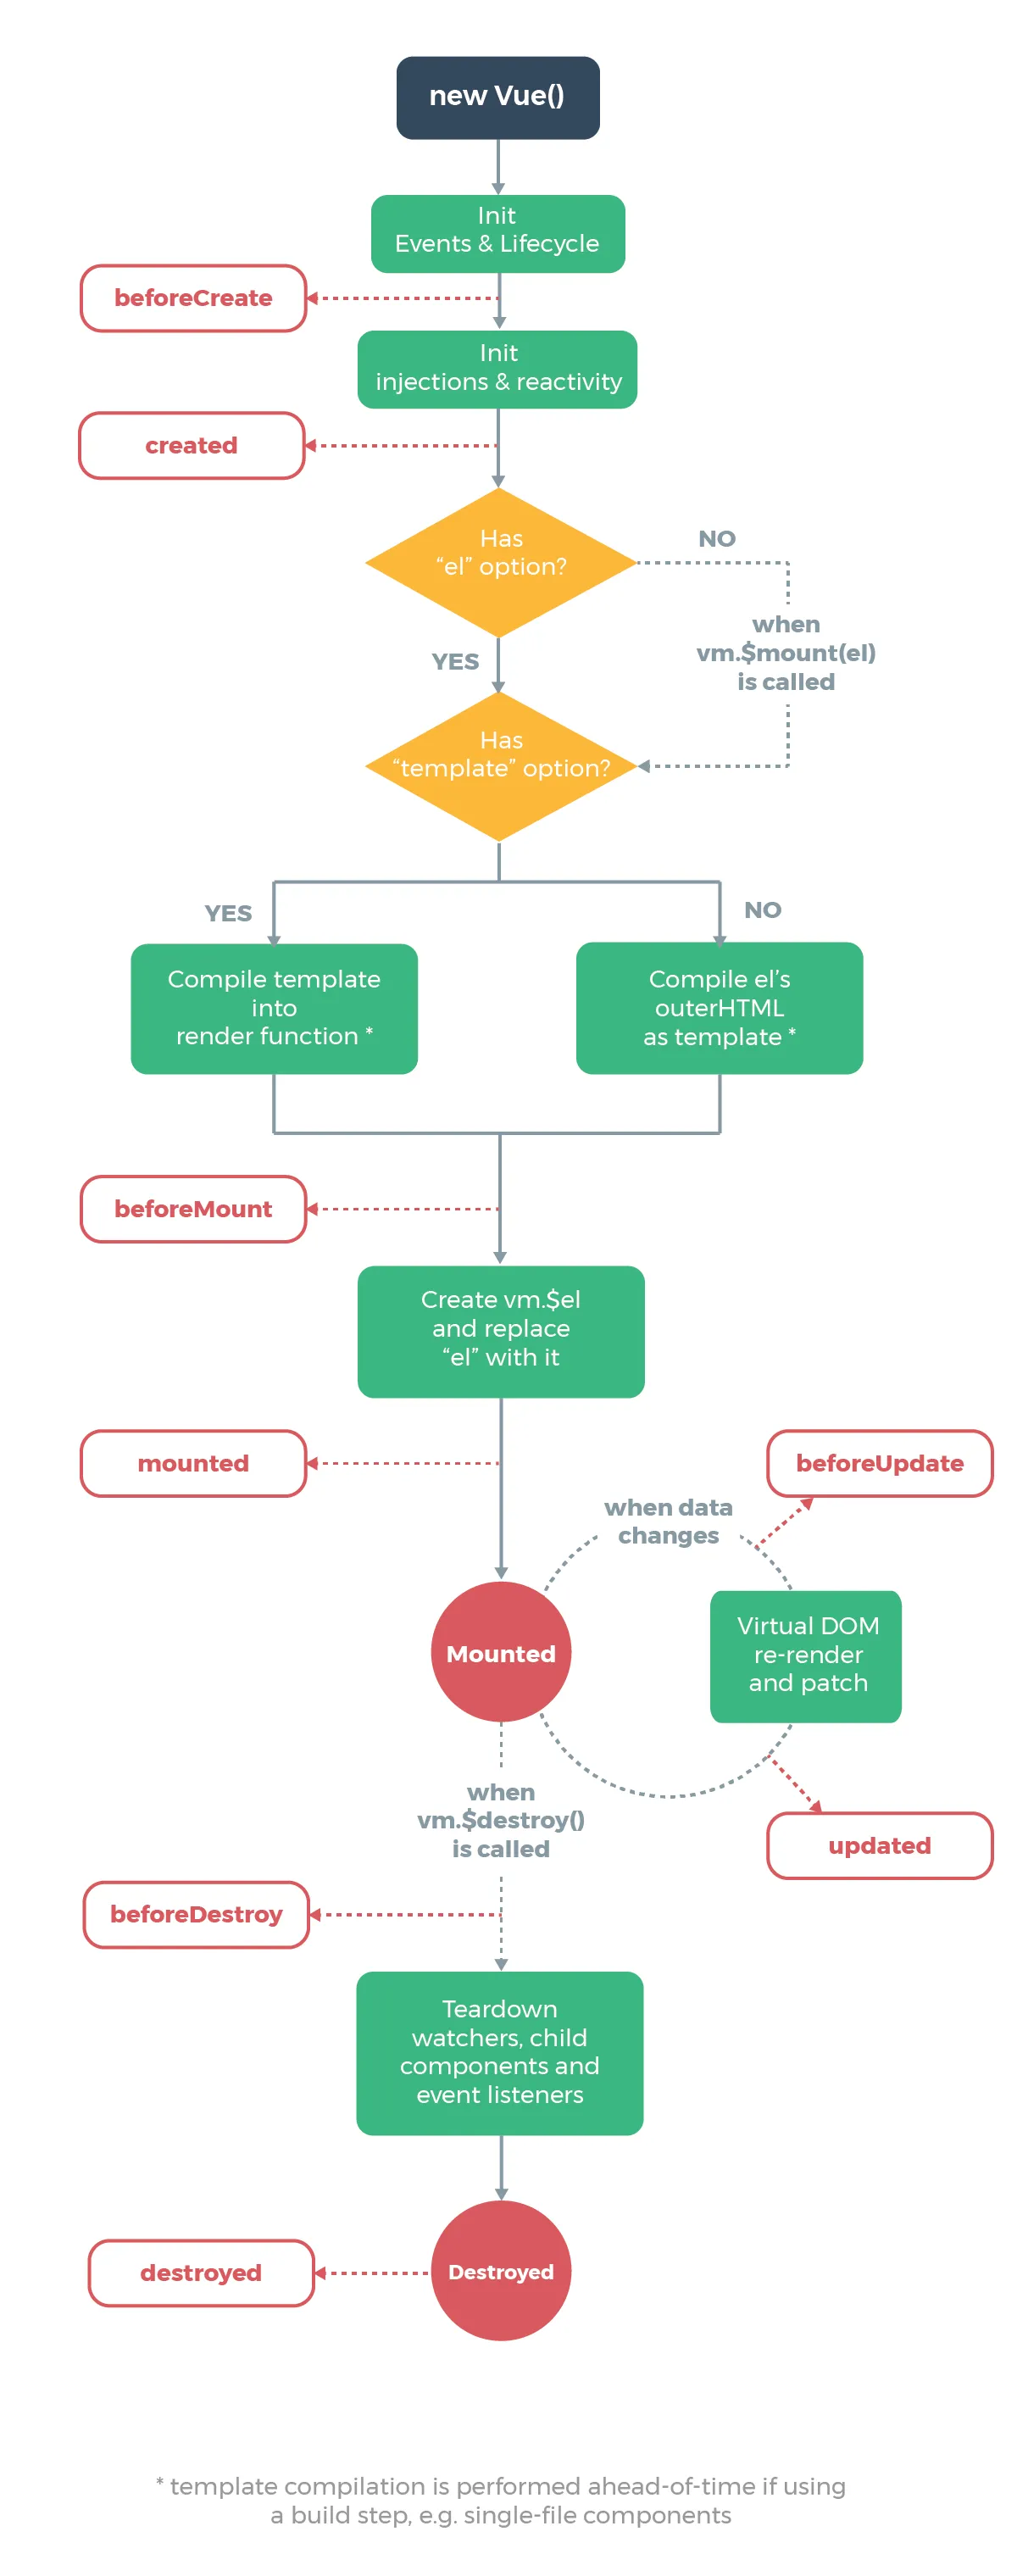
Life cycle of Vue2
Life cycle of Vue3
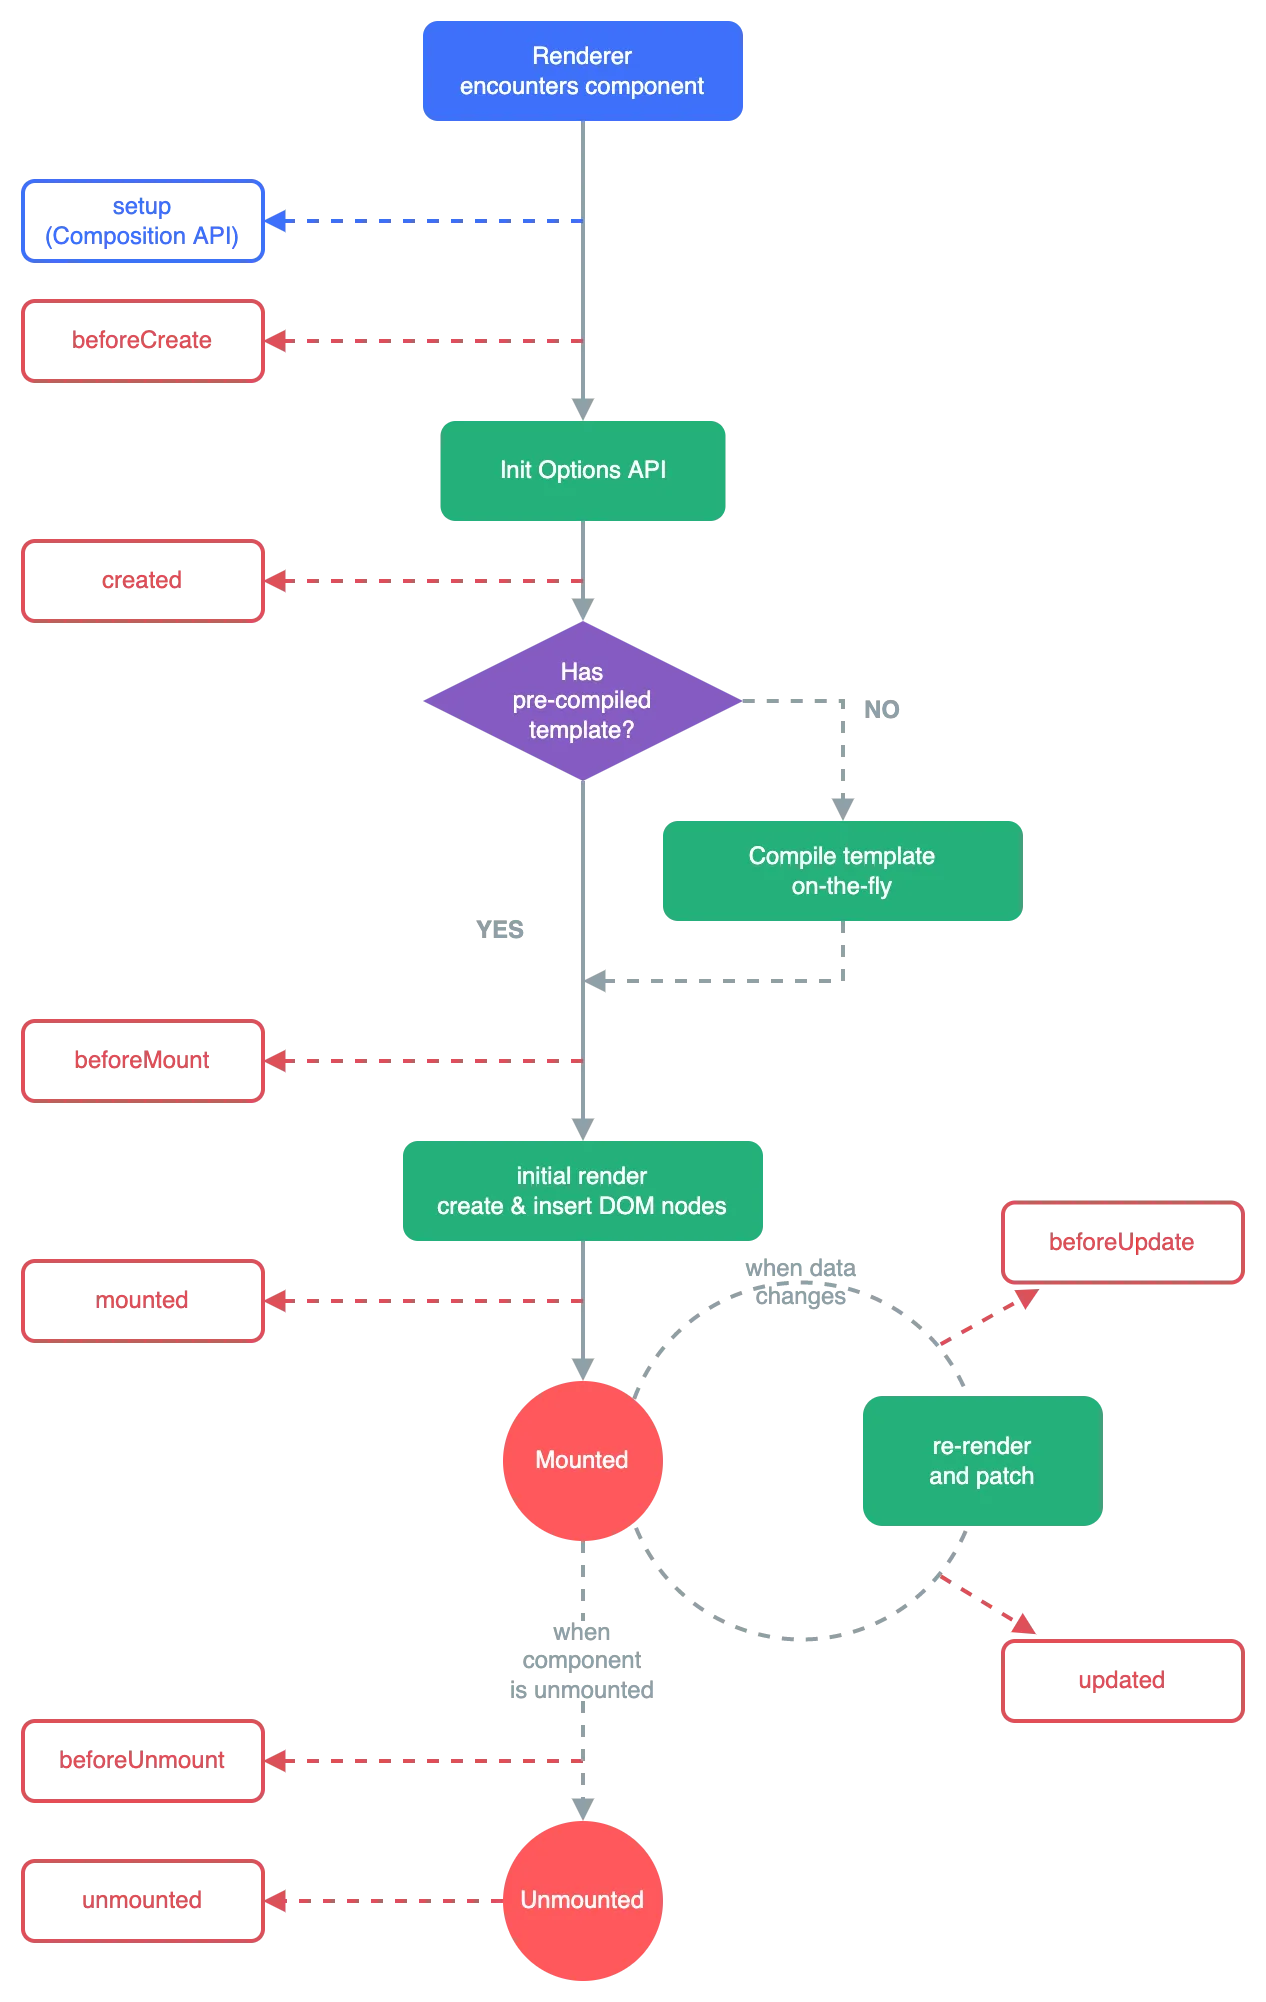
In Vue 3.0, you can still use the life cycle hooks of Vue 2.x, but two of them have been renamed:
beforeDestroy has been renamed as beforeUnmount
destroyed has been renamed as unmounted
Vue 3.0 also provides life cycle hooks in the form of Composition API. The correspondence with hooks in Vue 2.x is as follows:
beforeCreate ===> setup()
created =====> setup()
beforeMount ==> onBeforeMount
mounted =====> onMounted
beforeUpdate ==> onBeforeUpdate
updated =====> onUpdated
beforeUnmount => onBeforeUnmount
unmounted ==> onUnmounted
A Vue instance has a complete life cycle, which is a series of processes from starting to create, initializing data, compiling templates, mounting Dom to rendering, updating to rendering, and unmounting. This is called Vue’s life cycle.
beforeCreate (before creation): Data observation and initialization of events have not yet started, i.e., at this point, neither the reactive tracking of data nor the setting of events/watcher have been made. So, you cannot access the methods and data on data, computed, watch, and methods.
created (after creation): After the instance is created, the options configured on the instance including data, computed, watch, methods are configured. But the rendered nodes haven’t been mounted on the DOM yet, so you cannot access the $el property.
beforeMount (before mounting): It’s called before the mounting starts, when the corresponding render function is called for the first time. At this stage, the instance has completed the following configurations: compiled the template, generated HTML by combining the data and the template. But the HTML has not been mounted on the page yet.
mounted (after mounting): It’s called after the el is replaced by the newly created vm.$el, and the instance is mounted. At this stage, the instance has completed the following configurations: replaced the DOM object pointed by el attribute with the compiled HTML content. Completed rendering the HTML in the template to the HTML page. Ajax interactions would take place in this process.
beforeUpdate (before update): It’s called when the reactive data is updated. At this point, although the reactive data has been updated, the corresponding real DOM has not been rendered yet.
updated (after update): It’s called after the virtual DOM is re-rendered and patched due to data changes. At this time, the DOM has been updated according to the changes in the reactive data. You can perform operations dependent on the DOM when the hook is called because the component DOM has been updated. However, in most cases, you should avoid changing the state during this period, as this may result in an infinite update loop. This hook is not called during server-side rendering.
eforeDestroy (before destruction): This is called before the instance is destroyed. At this step, the instance is still fully available, this can still get the instance.
destroyed (after destruction): This is called after the instance is destroyed. After calling this hook, all things indicated by the Vue instance will be unbound, all event listeners will be removed, and all child instances will also be destroyed. This hook is not called during server-side rendering.
What’s the difference between the Composition API and React Hook as they are said to be quite similar?
From the perspective of React Hook’s implementation, React Hook is based on the call order of useState to determine the state of the next re-rendering. Therefore, there are a few restrictions:
Do not use Hook in loops, conditionals, or nested function calls
You must ensure it’s always called at the top level of your React functions
he dependence of useEffect and useMemo must be manually determined
On the other hand, the Composition API is based on Vue’s reactive system. Comparing to React Hook:
In the setup function, a component instance only calls setup once. However, with React Hook, the Hook needs to be called every time it re-renders. This creates more GC pressure for React and relatively slower performance comparing to Vue.
With the Composition API, you do not have to worry about the order of calls. It can also be used in loops, conditionals, and nested functions.
The reactive system automatically implements dependency collection, and the performance optimization of the component is done internally by Vue. However, with React Hook, dependencies need to be manually passed and the order of dependencies must be ensured, otherwise, component performance will go down due to incorrect dependencies when using useEffect and useMemo, etc.
Even though the Composition API is used in similar ways as the React Hook, its design concept is also a reference to the React Hook.
What’s the difference between the Composition API and the Options API?
Options API
The Options API, often referred to as the options API, is found in files with the Vue extension. It deals with page logic by defining properties and methods such as methods, computed, watch, data, etc.
For instance, if with the Options code writing style, if it’s about component state, it’s written in the data property. If it’s a method, it’s written in the methods property…
Organizing logic with component options (data, computed, methods, watch) is effective in most cases.
However, as components become more complex, resulting in a long list of corresponding properties, this can make the components hard to read and understand.
Composition API
In Vue3’s Composition API, components are organized based on logic functionality, with all APIs defined for a particular feature are grouped together (more high cohesion, low coupling).
Even if the project is very large and has many features, we can quickly locate all the APIs used for a particular feature.
Comparison
Below are two main comparisons between the Composition API and Options API:
Logic Organization
Logic Reuse
Logic Organization
Options API:
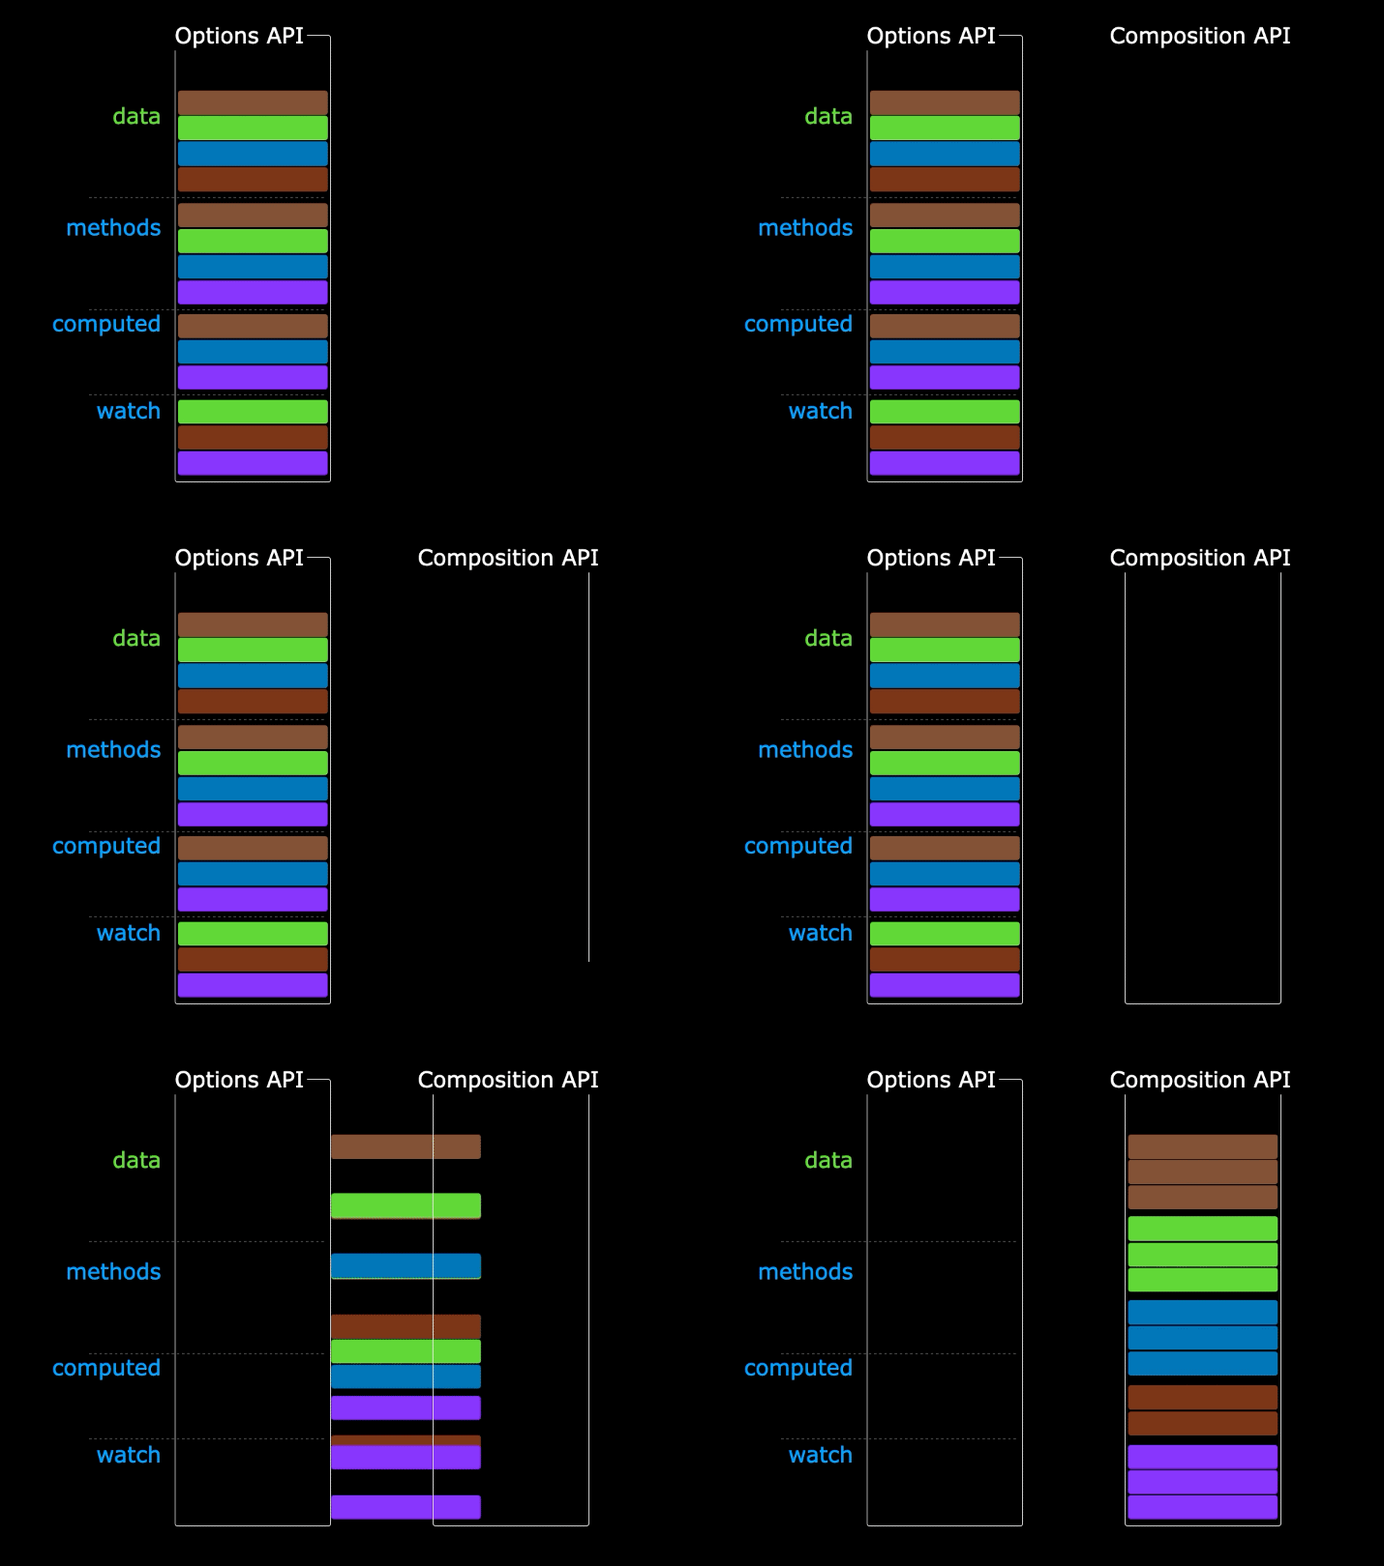
Suppose a component is a large component with many logic concerns within it (corresponding to the different colors in the figure below).

You can see that this fragmentation makes it difficult to understand and maintain complex components.
The separation of options masks potential logic problems. In addition, when dealing with a single logic concern, we must continually “jump” to the relevant code’s option block.
Compostion API:
The Composition API is used to address these issues by placing all the code related to a logic concern in one function. This way, when we need to modify a feature, we no longer need to jump around in the file.
Here’s a simple example, putting all the code related to the count property in one function.
| |
Use count in the component
| |
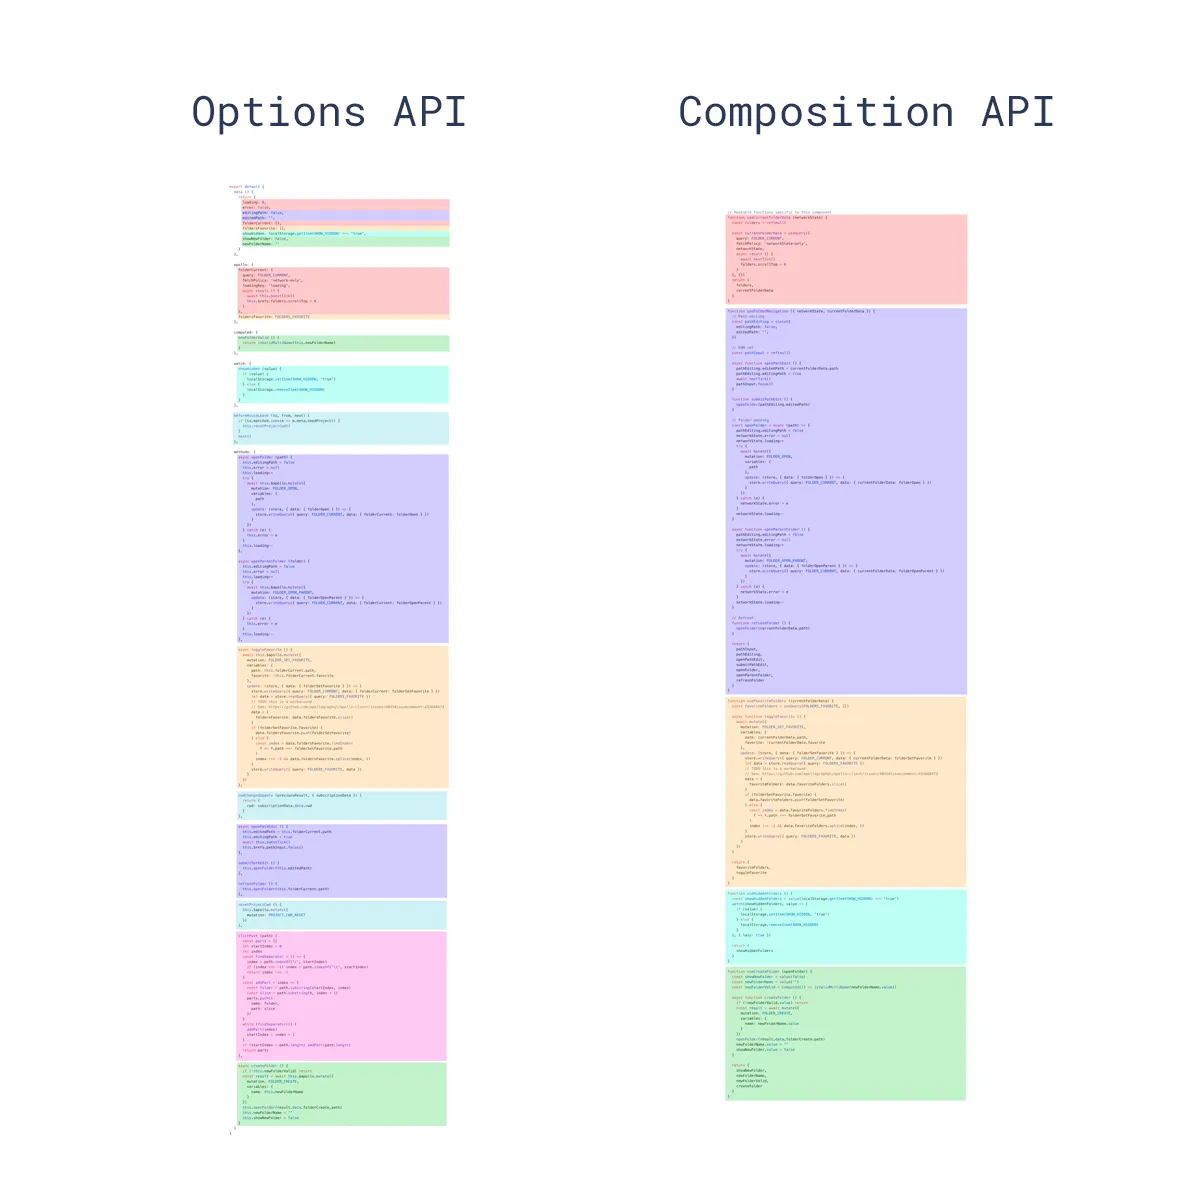
Here’s another figure for comparison. You can intuitively feel the advantage of Composition API in terms of logic organization. Later on, if you need to modify a property feature, just jump to the method controlling that property.
Logic Reuse
In Vue2, we used mixin to reuse the same logic.
Here’s an example: we would create a separate mixin.js file
| |
Then use it in the component
| |
The use of a single mixin doesn’t seem to be a problem, but when we mix a large amount of different mixins into one component
| |
there are two very obvious issues:
Name conflicts
Unclear data source
Now let’s turn the code above into Composition API style.
| |
Use it in the component
| |
You can see that the whole data source is clear now. Even if you are going to write more hook functions, you won’t have name conflicts.
Conclusion
In terms of logic organization and logic reuse, the Composition API is superior to the Options API.
As the Composition API is almost functional, it has better type inference.
The Composition API is tree-shaking friendly, and the code is more compressible.
You won’t see the use of ‘this’ in the Composition API, which reduces the ambiguity of this.
If it’s a small component, the continued use of Options API is also very friendly.
What is a Single Page Application (SPA), and how do you optimize the loading of the first screen?
A single page web application (SPA) is an application with only one web page. It is a web application that loads a single HTML page and dynamically updates that page as the user interacts with the application. Most of the Vue projects we develop are built quickly with official CLI scaffolding. We build an instance directly through new Vue and pass in el:#app as the mount parameter. After packaging with npm run build, we generate a single index.html, which is called a single page application.
Of course, Vue can also be introduced like jq, as the basic framework for multi-page applications.
SPA First Screen Optimization Methods:
Reduce entry file accumulation
Static resource local caching
On-demand loading of UI framework
Image resource compression
Component repeated packaging
Activate GZip compression
Use SSR
What performance optimizations have you done on a Vue project?
- v-if and v-show
Use v-show for frequent switching, taking advantage of its caching feature.
Use v-if for first screen rendering, it will not render if it’s false.
- v-for use key
When the list changes, use a unique unchanging key in the loop to take advantage of its local reuse strategy.
When the list is rendered only once, the key can use the loop’s index.
- Listeners and computed properties
The watch listener is used when data changes trigger other actions.
Make more use of computed computed properties. As the name suggests, these are newly calculated properties that will not trigger recalculation if the dependent data has not changed.
- Correct use of the lifecycle
Destruction of events bound or the timer happens at the destroyed stage.
When using dynamic components, you can cache them with keep-alive, and related operations can be activated in the activated stage.
- Data response processing
Data that does not need to be processed responsively can be handled with Object.freeze, or can be defined directly using this.xxx = xxx.
Properties that need to be processed responsively can be handled using this.$set instead of JSON.parse(JSON.stringify(XXX)).
- Route loading
- The page components can be loaded asynchronously.
- Plugin Import
- Third-party plugins can be loaded on-demand, such as element-ui.
- Reduce the volume of code
Use mixin to extract common methods.
Extract common components.
Define common methods in common js.
Extract common css.
- Compilation
If the template needs to be compiled online, the complete version of vue.esm.js can be used.
If the template does not need to be compiled online, the runtime version vue.runtime.esm.js can be adopted, which is about 30% smaller in volume than the complete version.
- Rendering methods
Server-side rendering; if the website requires SEO, you can use server-side rendering.
Front-end rendering; some backend management systems used internally by companies can adopt front-end rendering.
- Use of font icons
- Some pictographic icons should use font icons as much as possible.
Look at this article for more optimization content — What optimizations can be utilized for frontend performance?
What are the ways of communication between Vue components?
Ways of communication between Vue3 components:
props
$emit
expose / ref
$attrs
v-model
provide / inject
Vuex
mitt
Ways of communication between Vue2 components:
props
$emit / v-on
.sync
v-model
ref
$children / $parent
$attrs / $listeners
provide / inject
EventBus
Vuex
$root
slot
What are the common modifiers in Vue?
Form Modifiers
(1) .lazy
By default, v-model synchronizes the value of the input box with the data after each input event. You can add the lazy modifier, so that it synchronizes after the change event:
| |
(2) .number
If you want to automatically convert the user’s input into a numerical type, you can add the number modifier to v-model:
| |
(3) .trim
To automatically filter out the leading and trailing whitespace of the user’s input, you can add the trim modifier to v-model:
| |
Event Modifiers
(1) .stop
Stops the click event propagation.
| |
(2) .prevent
Prevents the tag’s default behavior.
| |
(3) .capture
The event triggers first on the node with the .capture modifier, then triggers inside the enclosed nodes.
| |
(4) .self
Triggers handler only when the event.target is the current element itself. That is, the event is not triggered from inside elements.
| |
(5) .once
Unlike other modifiers that only work on native DOM events, the .once modifier can also be used on custom component events, meaning that the current event is triggered only once.
| |
(6) .passive
The .passive modifier can especially improve performance on mobile devices.
| |
What is the function of $nextTick in Vue?
| |
Official definition of its function:
Execute the deferred callback after the next DOM update cycle. Use this method immediately after changing data to get the updated DOM. What does that mean? We can understand it as follows: Vue updates the DOM asynchronously. When data changes, Vue will start an asynchronous update queue. The view needs to wait for all data changes in the queue to complete before updating it collectively. The core of Vue’s asynchronous update mechanism is that it leverages the browser’s asynchronous task queue. The micro task queue is preferred and the macro task queue is secondary. When reactive data is updated, it calls the dep.notify method, notifying the watcher collected in dep to execute the update method. watcher.update will put watcher itself into a watcher queue (global queue array). Then the nextTick method will put a flushSchedulerQueue method (a method that refreshes the watcher queue) into a global callbacks array. If there is no flushCallbacks function in the browser’s asynchronous task queue, it will execute the timerFunc function and put the flushCallbacks function into the asynchronous task queue. If there is a flushCallbacks function in the async task queue, wait for it to finish and then put the next flushCallbacks function in. The flushCallbacks function is responsible for executing all flushSchedulerQueue functions in the callbacks array. The flushSchedulerQueue function is responsible for updating the watcher queue, i.e. executing the run method for each watcher in the queue array, thus entering the update phase, such as executing component update functions or user’s watch callback functions.
How to understand two-way data binding
As we all know, Vue is a framework for two-way data binding, which consists of three important parts:
Data layer (Model): The data and business logic of the application
View layer (View): The display effect of the application, various UI components.
Business logic layer (ViewModel): The core part encapsulated by the framework, which is responsible for associating data with the view.
This layered architecture can be professionally referred to as: MVVM. The core functionality of the control layer here is “two-way data binding”.
Naturally, we just need to understand what it is, and then we can further understand the principle of data binding.
Understanding ViewModel
Its main responsibilities are:
Update the view after data changes
Update data after view changes
Of course, it also consists of two main parts:
Observer: Listens to all data properties
Compiler: Scans and parses the instructions of each element node, replaces data according to the instruction template, and binds the corresponding update function.
What is the difference between v-show and v-if? Can you explain it?
The effect of v-show and v-if is the same (not including v-else), both can control whether the element is displayed on the page, and they are used the same way.
Differences:
Different control methods
Different compilation processes
Different compilation conditions
Control method: If v-show hides, css — display:none is added to the element, and the dom element is still there. If v-if shows or hides, the dom element is entirely added or deleted.
Compilation process: v-if switch has a process of local compilation/unloading. During the switch, event listeners and subcomponents inside the conditional block are properly destroyed and recreated; v-show just simply switches based on css.
Compilation condition: v-if is true conditional rendering. It will ensure that event listeners and subcomponents in the conditional block are appropriately destroyed and recreated during the switch. When the rendering condition is false, no operation is performed until it is true to render.
When v-show changes from false to true, it will not trigger the lifecycle of the component.
When v-if changes from false to true, it triggers the beforeCreate, create, beforeMount, mounted hooks of the component. When it changes from true to false, it triggers the beforeDestory, destoryed methods of the component.
Performance consumption: v-if has higher switching costs; v-show has higher initial rendering costs.
Have you ever used keep-alive? What is it for?
Vue supports components and also has a built-in component keep-alive for caching that can be used directly. The usage scenarios are for route components and dynamic components.
activated represents the lifecycle of entering the component, deactivated represents the lifecycle of leaving the component
include represents that only matched components will be cached, exclude represents that matched components will not be cached
max represents how many components can be cached at most
Basic usage of keep-alive:
| |
Using includes and exclude:
| |
Using RegExp(v-bing)
| |
Using Array(v-bing)
| |
The match first checks the component’s own name option. If the name option is not available, the match checks its local registration name (the key value of the parent component’s components option). Anonymous components cannot be matched.
Two more lifecycle hooks (activated and deactivated) will be created for the components with keep-alive cache settings:
When first entering the component: beforeRouteEnter > beforeCreate > created > mounted > activated > … … > beforeRouteLeave > deactivated
When entering the component again: beforeRouteEnter >activated > … … > beforeRouteLeave > deactivated
Can you implement a Virtual DOM?
First, let’s see how the browser understands HTML:
| |
When the browser reads these codes, it constructs a DOM tree to keep track of everything, as you would draw a family tree to track the development of family members. The above HTML corresponds to the DOM node tree as shown in the following figure:
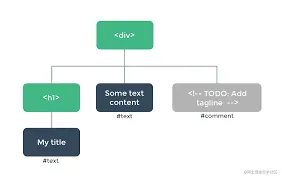
Each element is a node. Every piece of text is also a node. Even comments are nodes. A node is a part of a page. Just like a family tree, each node can have child nodes (that is, each part can contain some other parts).
Next, see how Vue understands HTML template
Vue constructs a Virtual DOM to keep track of how it will change the real DOM. Because the information it contains will tell Vue what kind of nodes need to be rendered on the page, including the description information of its child nodes. We describe such nodes as “Virtual Node(VNode)”. “Virtual DOM” is our name for the entire VNode tree built up by the Vue component tree.
In other words, the browser’s understanding of HTML is the DOM tree, Vue’s understanding of HTML is the virtual DOM, and finally in the patch stage, it is rendered into real DOM nodes through DOM operation APIs. How to implement Virtual DOM First, let’s look at the structure of VNode in vue
Source code location: src/core/vdom/vnode.js
| |
Here, a brief explanation of VNode:
The context option of all objects points to the Vue instance
The elm property points to the corresponding real DOM node
vue generates VNode via createElement
Source code location: src/core/vdom/create-element.js
| |
As you can see above, the createElement method is actually a wrapper for the _createElement method, and it judges the parameters that are passed in
| |
We can see that _createElement receives 5 parameters:
context represents the context environment of VNode, which is of the Component type
tag represents the tag, it could be a string, or it could be a Component
data represents the data of VNode, it’s a VNodeData type
children represents the current child nodes of VNode, it can be of any type
normalizationType represents the type of child node normalization, different types have different normalization methods, it mainly refers to whether the render function is generated by compilation or written by the user
According to the type of normalizationType, children will have different definitions
| |
The simpleNormalizeChildren method is called when the render function is generated by compilation
The normalizeChildren method is called in the following two scenarios:
The render function is written by the user
Compilation of slot, v-for will generate a nested array
Whether it’s simpleNormalizeChildren or normalizeChildren, both are for normalizing children (turning children into an array of VNodes), but I won’t go into the details here.
The source code location for normalizing children is: src/core/vdom/helpers/normalize-children.js
After normalizing children, VNode is being created.
| |
createComponent is also used to create VNode.
Source code location: src/core/vdom/create-component.js
| |
Let me mention the three key steps in creating VNode through createComponent:
Construct subclass constructor Ctor
installComponentHooks installs the component hook function
Instantiate vnode
Summary
The process of createElement creating VNode, each VNode has children, and each element of children is also a VNode. This forms a virtual tree structure, which is used to describe the real DOM tree structure.